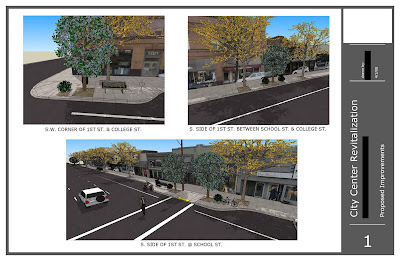
Tuesday, June 17, 2008

CAD Cleanup Scripts

The most valuable information I leaned this last week was about Ruby Scripts.  This was something I didn't know much about and just thought that it wasn't necessary.  There is no doubt that Sketchup will ever replace Civil3D because of the way that program connects and integrates pipe networks, surfaces, profiles, etc.  Also, there will be many times when we are working with other people or firms who are using different cad software.  However, Sketchup offers a unique way to show projects in 3D and rather than re-drawing every project in Sketchup, we can use the cad file as a base.

The time consuming and challenging part of taking a cad drawing and turning it into a 3D model comes from cleaning up the cad file and then making faces.  When line work doesn't connect where it is supposed to, or line work overlaps, we have to manually fix these problems before we can use it properly in Sketchup.  There are a series of Ruby Scripts that can be run in a particular order that will speed up the process.  All of theses scripts are avalable on Smustard.com.

IntersectOverlaps - Causes lines that cross and do not intersect to intersect.

CloseOpens - This script looks for lines that are supposed to touch and don't, and then draws a line connecting the open segments.  Open line segments keeps faces from being created.

ExtendCloseLines - This script will find lines that fall short of touching their intended target and extends them in a straight line to touch their intended target.

DeleteShortLines - This script will remove those annoying little lines that overshot their target. 

MakeFaces - This script will create faces where it is possible to create faces.  A critical time saver for transferring Cad files to Sketchup.

MakeFaces is a free scrip and the others are all under $20 each.  I can guarantee that you will save more time and money purchasing and using these scripts than doing all that work by hand.

In order to run most of these scripts you need to add another basic one.  It is called  ProgressBar and is free.  This will display a progress bar on the status line while a script is running to let you know how long it will take to complete the script.

By clicking on any one of these links above it will take you to the Smustard website link directly to that script.  You can then download and/or purchase the script.  In later blogs I will make some video tutorials that show how to use these scripts and show the benefits of them. 

Happy Sketching!

Thursday, June 12, 2008

Google Sketchup 3D Basecamp Day 2

Today was another great day at the Google Headquarters. The day was packed full of hour long sessions to choose from. During the first hour session I chose to forgo the sessions and visit the 'Sketchup Lab.' This is the play to go to share models, experiences, troubles, and get help. One of the Ruby Script authors was there sharing some extremely valuable information. His name is Todd Burch and he has many scripts on the Smustard website. Stay tuned for some exciting information that will drastically transform the way you take Autocad or Civil3D files into sketchup to model in 3D.

The other sessions I attended taught me alot about how to manage large models and how to work with the 'sandbox' tools and digital terrain.

I am excited to share what I have learned and I hope you all find it useful. If any of you reading this have been here at the Sketchup Base Camp please let me know. I'd love to connect with more people that use this software in a similar manner.

Wednesday, June 11, 2008

Sketchup 3D Basecamp Day 1

Today was the first day of the Google Sketchup 3D Base camp. I have nothing but good things to say about the experience so far. Today I attended three sessions: Smart Modeling, Geo modeling, and Sketchup & Autocad.

I will share in more detail the useful things I learned. The Smart Modeling session was about making models that were organized and did not have more detail than is needed. This will greatly useful in the large models that we build.

Geo modeling was about taking a photograph, and using the 'photo match' tool to build a 3d model, and then placing the model into Google Earth.

Sketchup and Autocad was about just that. The interface between sketchup and Autocad. This session had the most valuable information of the day. Stay tuned for some great time saving tips for taking your Autocad files and turning them into Sketchup Models.

Tomorrow is going to be another great day! I am looking forward to it.

Wednesday, May 28, 2008

Google Sketchup Tip: Field of View

I came across this tip the other day and thought I would share it on this blog.  If you have ever been modeling and wished that you could see more inside the window without zooming out, then this tip is for you.  Many times, zooming out doesn't work because there is an object or wall that will come between the 'camera' and what you are looking at in Sketchup.  By changing the field of view you can increase or decrease what is shown in the window.

The video above is quite thorough but I would like to add one note.  If you are a photographer, you know that different lenses can be characterized by their zoom or 'field of view.'  A 20mm lens is more of a wide angle lens than a 300mm zoom lens.  You can also input the desired field of view in Sketchup as millimeters instead of an angle.

I hope that this tip helps you in your sketches!

Wednesday, May 21, 2008

Google Sketchup 3d Basecamp

It's official.  I was selected randomly to go to the Google Sketchup 3d Basecamp.  Basically, it is a seminar or conference all about Sketchup.  I will have the opportunity to head down to the Googleplex and hear some speakers on some great topics.  Here are a few of the topics that I am most looking forward to:

-Working with large models
-Sketchup and Digital Photography
-Taking your models into Photoshop
-Working with terrain and other irregular surfaces
-Sketchup and Autocad

Here is a complete schedule of events and topics for the Basecamp

I will be sure to take plenty of photos and share all the great information that I learn.

Thursday, May 1, 2008

Intelisum - Processing LIDAR Data

InteliSum, Inc. has developed innovative and patented 3-D InteliCamera™technology that fuses LIDAR XYZ coordinates, digital image (RGB) data, and geophysical position (GPS) information to create Life Dimensional™ image (LD3™) files. Our intelligent pixel (InteliPixel™) technology allows easy capture of 3-dimensional objects and environments, plus fast, seamless transition (transfer) into computer aided design (CAD) software.
I think we will try the demo of this software and see how well it works.  I will let you know how it works.  If there are other programs that some of you may know about that are used to process LIDAR data, let us know.


Monday, April 28, 2008

Our City in 3D

Here is an image of our City.  This is still a work in progress.  Our plan is to build a model of the downtown area and then add more as time goes on.

Friday, April 25, 2008

Cities in 3D Program


Last week I had a phone call meeting with Google! It was pretty exciting to actually speak with someone from Google. The reason I had the conversation with them was to discuss the data that we had at the City that we could share with them. The purpose as you can see in the video is to have the 3d city show up in google earth, only not quite as grand as the large cities. We are currently working on developing a 3d model of our city.

Other data that we will share with Google is the aerial photography and digital terrain data. Google Earth and drafting software (Civil3d, Microstation, etc.) are becoming more compatable with each other, so the more accurate data that can be found on Google Earth, the better.

Here is a link to the Cities in 3D program if you are interested:
http://sketchup.google.com/3dwh/citiesin3d/index.html

Monday, April 21, 2008

Roundabout In Sketchup

I found this video of how to create a roundabout in Google Sketchup.  Pretty interesting approach.  While we were first playing around with Sketchup here we used a design from microstation to create a 3d model of a roundabout.  This video shows how one would be created from scratch in sketchup.  One of the best things I learned from this video is the "follow me" tool.  Watch as the rolled curb is created and how the follow me tool makes this so easy.


Friday, April 18, 2008

Here is the video that I made for the city center improvements project.  The video shows what will be seen from the drivers perspective and then from a pedestrian perspective.

Thursday, April 17, 2008

City Center Revitalization
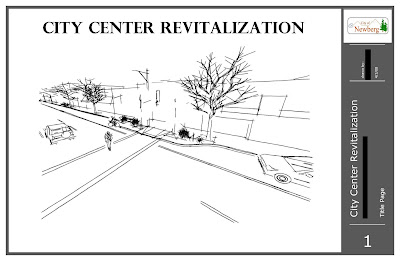


Here is a project that I have been working on for our planning department.  They are working with a committee that is putting together a plan to do some urban renewal type projects.  This is a rendering of some added bulb-outs and added street trees and benches and plants.  I don'tparticularly agree with the project, but I do have to say that Sketchup has been a great resource for displaying the project.  

The committee will be using the drawings as well as a video to assist in getting funding for the project.  They will also use this information to show the local business owners the project.  

I am working on getting Adobe Photoshop and Premiere Elements here at work so I can edit the building photos before I use them.  I would like to remove the cars and trees from the building photos.  Premiere is a video editing software that I will use to put multiple videos together and to add text and sound to the videos.

Let me know if you have any suggestions!

Wednesday, April 16, 2008

Raised Crosswalk
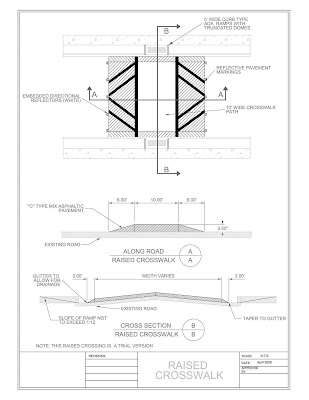
My co-worker was asked to put together a standard drawing of a raised crosswalk. There is a place in town where a more visible crosswalk is desired so he was tasked with coming up with the standard drawing for it. In addition to the standard cad drawing of the detail he drafted a sketchup version. As you can see in the images below, it is much easier to see what is proposed in the 3d drawings.


Please let us know what you think about this and if there are any aspects of the drawing that you would like to have further explanation.

Thursday, April 10, 2008

Real World Example

The video posted in an earlier post was from Yates Austin of North Carolina. I have been talking with him about how he has come to use Google Sketchup over time. Here is a summary along with a couple of images that he has sent me:

I started using Sketchup 5.0 in late 2005, not too long before Google acquired @Last Software, the creator of Sketchup. I am a CAD operator, with a background in Architectural design and visualization. I transitioned to working on Civil and Structural Engineering projects in late 2007 and introduced Google Sketchup to our office. The benefits of using Sketchup for presenting complicated design information to a non-technical audience was recognized early on, and I’ve begun hosting Lunch & Learn Sessions with the free version of Sketchup 6.0 for civil, structural and geo-technical engineers, geologists and geo-physicists within our office.

Attached are two images of a concrete labyrinth spillway dam. Much of the 3D Geometry for these images was generated in both Civil 3D 2008 (dirt embankments and grading) and Architecture 2008 (concrete walls and slabs).

Happy Sketching!


Wednesday, April 9, 2008

Importing Google Earth Image & Terrain

Google designed Google Earth and Google Sketchup to work together very well. One nice feature is to be able to import aerial imagery and terrain information from Google Earth into Google Sketchup. There are many reasons we would want to do this, one obvious one being that we don't live on a flat plain. As I learn more about how to incorporate my designs into the Google Earth terrain I will share more.

The video below shows just how simple it is to import Google Earth images and terrain into our sketchup models. There are a couple settings in Google Earth that need to be correct in order for the import to work properly.

1. Make sure that the "Terrain" layer is turned on in Google Earth.

2. Make sure that the elevation exaggeration is set to "1". Do this in Google Earth by going to the "Tools" menu. Then "Options" › "View" › "Terrain Quality" › "Elevation Exaggeration" = 1.

3. Also for improved terrain and image quality you can set the Google Earth view area to the largest setting. In Google Earth: "Tools" › "Options" › "View" › "Detail Area" = Medium or Large.

After you do that all you have left to do is to zoom (in google earth) into the area you want to import and click the get current view icon in Google Sketchup. (Looks like the Google Earth icon)

Here is a video that shows how this is done. You can see that as you are working on your model, you can toggle on and off the image and the terrain.


Tuesday, April 8, 2008

Concrete Spillway

Here is a video I found on Youtube of a guy who made a video presentation of a concrete spillway conceptual design. His name is Yates Austin from Greensboro, NC. You can see at the end how he embedded the video into the earth. What a great way to show a client what your design will look like!

Drawing Curb Ramps In 3D


Drawing curb ramps was something that took a little bit of playing around with to figure out.  One way to look at it is to compare it to a surface tin in Autocad or Microstation.  Each triangle you draw will be a surface.  When you move up or down a particular line segment, if you don't already have the "tin" drawn, it will assume one for you.  By drawing in the curb ramp, and then pulling down the line segments at the curb, you can draw a 3d curb ramp very easily.  It is much easier to see what I am saying by watching the video below.

If you look at this image and as you watch the video you will see that as I pull the curb, sketchup automatically adds a line to segment the rectangular section into two triangles.  I figured out later that the reason for this is that all the lines of a rectangle need to be parallel to each other in order to have a square or rectangular surface.  After I figured this out I drew this ramp and you can see the difference.  This also enables me to draw a rectangle on the ramp and fill it in yellow or red or whatever color you choose for your ADA truncated domes.

This same method can be used to draw driveways or any other ramp.

A tip for when you are moving an entire line segment is to hold down one of the arrow keys to lock a particular axis.  In this video I hold down the down arrow to lock the blue (vertical) axis.  It makes it much easier to move lines and objects in the direction you desire.
                    

Monday, April 7, 2008

Sketchup Tip: Creating Curbs is Easy

I want to show an easy way to create curbs. In this example I will use a basic 4 way intersection and we will add textures and then make the curb stand out as 3d.

1. Start out by drawing out the line work for the curb and sidewalk and roadway. Make sure that everything is closed and is a surface. It will look something like this:


2. Next fill in the surfaces with textures. Sketchup comes pre-loaded with many textures. There are also some downloads to add more materials to your library. The link to download them is here: http://sketchup.google.com/bonuspacks.html. A tip to make things easier is to make the asphalt the same material as the curb. You'll see why in the next step.


3. Using the push/pull tool drop the asphalt surface 6 inches. You can see that sketchup assumed the surface of the face of the curb to be the same as the surface that was pushed. That was the reason for making the roadway surface to be the same as the curb surface. If you had made the roadway surface to be asphalt, then the face of the curb would have also been asphalt and you would have to change each face on the curb to be concrete, which would be time consuming.

4. Now change the roadway surface back into an asphalt material and you are finished. A 3d version of a roadway intersection.


In the next post I will show how to make ramps at the intersections.

Friday, April 4, 2008

Local Improvement District
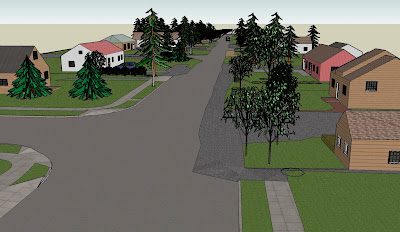

One great use for sketchup is to be able to convey to the general public what a project may look like. In this particular case we were working on a Local Improvement District where we go in and improve the road. The road would get wider in some areas and curb, gutters, and sidewalk would be added as well as storm drainage. The traditional way of showing the residents what they will be getting for their money is to give them a 2d black and white autocad drawing and maybe some photos of nearby areas. With sketchup you can show them a 3d view of their house and the before and after. I haven't created the proposed improvements view yet but this image above shows an area that doesn't have sidewalk and a wide enough road. The idea would be to show this image and then another image that would have the sidewalk and road width continuing through.
Other benefits would be to convince a City Council or County Commission that a project is worth doing. With 3d renderings and videos it is much more convincing that a project has value than the standard 2d cad drawing.